GM 3.4 L32 ENGINE INSTALLATION
Updates:
- 11/25/14 GM HT 3.4 discontinued
- 07/20/14 Added VIN & engine code info.
- 05/03/11 Updated Disclaimer and Engine Choices sections.
- 02/21/08 Updates to Exhaust manifold, clutch, and mount sections, added ECM section
- 07/17/07 Timing recommendations
- 10/5/06 Cold-start injector, oil-priming, and ECM updates added.
- 8/17/05 weblog conversion, mounts, water pump, starter, timing cover, and vendor sections updated.
***DISCLAIMER!!***
This article is written for the benefit of the Fiero community and is intended only for an audience that is experienced with safe automotive work. It is assumed that you know proper jack use and jackstand placement and engine lifting safety. It is assumed that you have obtained a shop manual (Haynes recommended) and know proper procedures for removing/installing components. If not, please read through chapter 2b and 2c in the Haynes manual (or the Engine chapter in an equivalent manual) to familiarize yourself with any special tools or procedures detailed within. You do this entirely at your own risk, it will void your factory warranty, and Santa Claus will no longer visit your home. That said, enjoy 🙂
This page is evolving with new additions and changes as I and others who have done this conversion learn more as we go along. This documentation was originally written in 2001 and the conversion is thoroughly time-tested. Do check back for updates, and if you have suggestions or comments to make, they may be added at the bottom of this page or through PFF to user crazyd. Also, please read or search the entire page before asking questions, as they have most likely been answered here already.
Index
- Pictures of the first 3.4 project
- Getting Started
- 3.4 Engine Choices
- Gaskets
- Mounting the 3.4 Engine On Its Stand
- Oil Filter Adapter
- Mounting the Flywheel/Flexplate
- Relocating the Starter: Drilling the Holes
- Tapping the Starter Holes and Mounting the Starter
- Exhaust Manifolds
- Bellhousing
- Block Chop
- Oil Pan
- Timing Cover
- Cleaning Gasket Surfaces
- Water Pump
- Harmonic Balancer
- Accessory Transfer
- Oil Pressure Sender and A/C Compressor
- Clutch
- Mounts
- Installing the Engine Back On the Cradle
- Setting the Ignition Timing
Essential items
Essential items
- An 85-88 Fiero with an existing 2.8 V6 engine (SE, Formula or GT)
- 7, 10, 13, 15, & 18mm sockets and wrenches, 10/13/15mm deep
- Ratchet extensions (3″, 6″, & 10″)
- 5/8″ & 13/16″ wrenches for fuel lines
- at least two ratchets, one of which should have a flexible head
- disposable latex exam gloves
- brake cleaner, silicone grease, 3-in-1 oil, gasket remover or scraper, threadlocker, anti-seize
- cradle dolly. Must build to support at least 600 lbs. Specs will be posted in another document.
- Engine hoist, A-frame, or lift
- allen wrenches or hex-head bits
- shop manual – Haynes, Helm or Chilton
Getting Started
-
Initial steps
These are all detailed in your shop manual.
- Remove the engine cradle from the Fiero and place it on the cradle dolly. Note: If your car has A/C, be sure to seal the A/C lines where you detach the compressor hoses. Use something that will keep moisture and critters out, but will not leave any debris behind.
- Separate the engine from the transmission and remove it from the cradle.
- Undress the 2.8 down to the longblock in preparation for the 3.4 transfer.
-
3.4 Engine Choices
-
Let’s get one thing clear from the start, as it confuses a lot of people new to this – the only engine you can use for this swap is from a 1993, 1994 or 1995 V6 Camaro or Firebird, GM part # 12363230 and also known as engine option code L32, VIN code “S”. I can assure you there are no other choices – no other car made by GM ever used this engine, so don’t bother asking about it or searching for a substitute because there isn’t one. Period. Yes, there are lots of other 3.4 liter engines made by GM, and I am familiar with each and every one of them. Yes, they can be installed in a Fiero, but they are completely different from this one, they are substantially more difficult to install, and they are not compatible with this conversion. If you would like to see what else is involved, you may wish to take a look at my other site, dohcfiero.com. Stop asking me about it, because it makes me grumpy.
-
If you choose to get a new engine, the one you want is GM part number 12363230. I’ve seen it for around $1800 as of this writing. Ignore the warning about it not being compatible with a manual transmission, that’s for an S10 swap and it will work in your Fiero.
As of November 2014 the HT 3.4 (12363230) has been discontinued and is no longer available from GM, so you’ll need to visit your local junkyard.
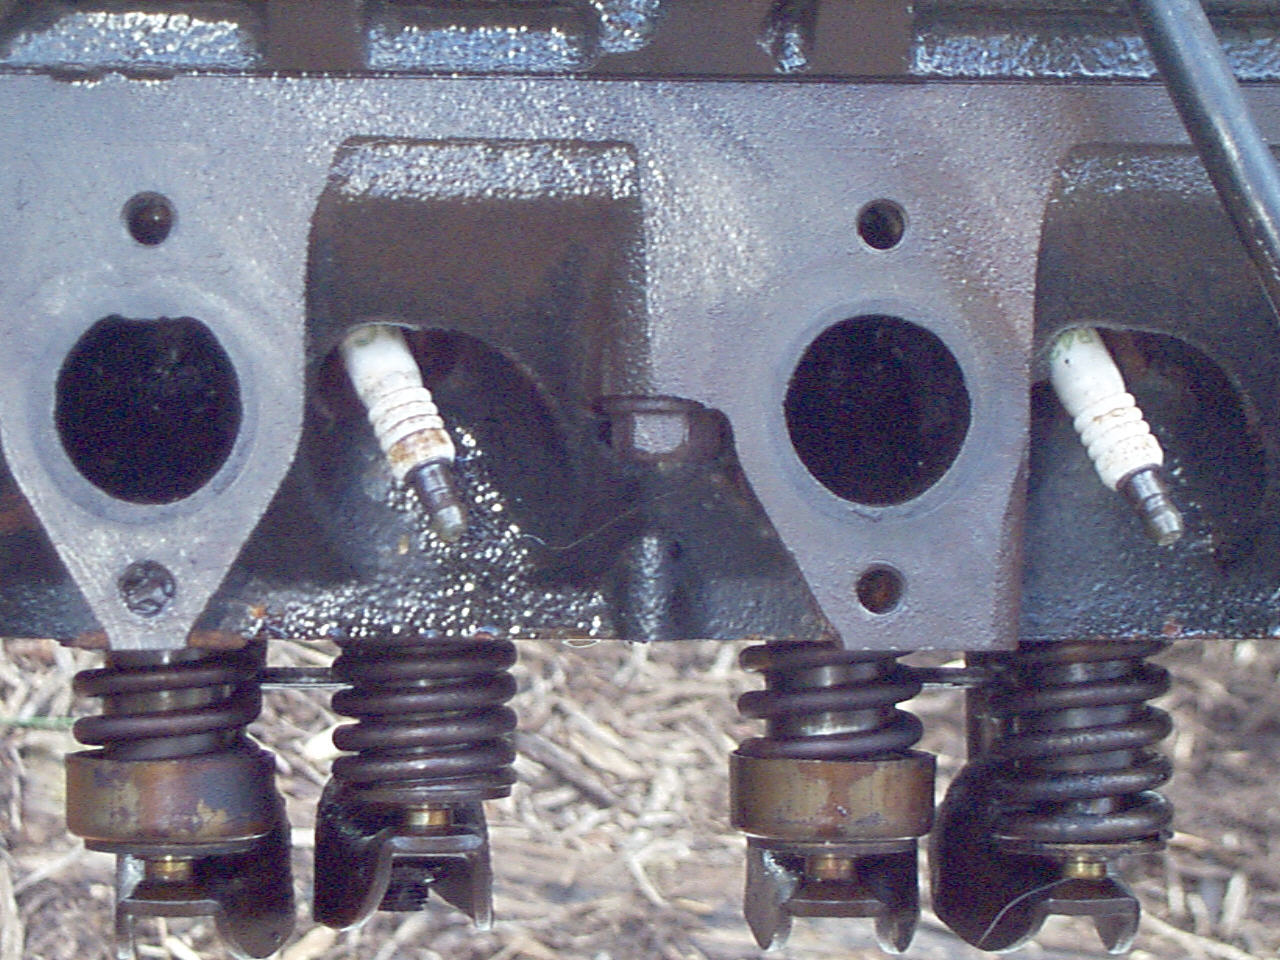
If you want to buy new injectors, you’ll need to get the 17# injectors for the ’93-’95 Camaro/Firebird, which are the same part for a Chevy 305 (5.0) engine too. The injectors from a Ford “5.0” (302ci) engine will also work, but since they are a 19# variety you will need an adjustable fuel pressure regulator to use these. Otherwise your air/fuel mixture will be too rich and will foul your spark plugs, reduce fuel economy, increase exhaust emissions and may damage your catalytic converter. -
If you choose to get a used engine, you’ll need to dig up a 93-95 V6 F-Body (Camaro/Firebird) in your local junkyard. Look for VIN code “S” in the 8th digit. I suggest using car-part.com or row52.com to search for a Camaro or Firebird near you. You will need to strip it all the way down to the longblock (heads, block and all internal mechanicals, including the balancer). Use of the oil pan will be discussed later. Remove and keep the fuel injectors from the 3.4’s fuel rail, as they are a 17# higher-flow type than the 15# ones on the 2.8. Be careful removing them from the rail and inspect the O-ring seals for re-use. The original Fiero fuel pressure regulator on the fuel rail will work fine with these injectors. Everything else that may be included with the engine – flywheel/flexplate, intake plenum, intake manifold, fuel rail, water pump, timing cover, wiring harness, pulleys, modules, brackets, sensors, plug wires, etc. should be placed in a big box. You may be able to get a credit back from the recycler for these parts. Also remove the metal plug that blocks the distributor hole, and clip the wires from the crankshaft position sensor at the harmonic balancer on the 3.4. The Fiero ECM does not use this sensor, and it keeps the hole plugged in the block by leaving it installed.
These engines usually go for about $500-$800 depending on mileage and demand/availability. I paid $650 for my current engine, with 51k miles on it, and two others have paid $450 for 68k and 74k engines. The higher the mileage over 50k, the more you’ll want to consider replacing the cam and lifters while you’ve got the engine and pushrods out, since this will affect the “newness” feeling to the engine’s drivability and its longevity. An excellent deal is the Crane Compucam 2030 Series Cam/Lifter Kit, which you can get from any decent speed shop, or Jeg’s and Summit have it online for under $200. This cam is not a performance upgrade, however. For that the Crane H272 would be the better choice. Joe Wynman is also reputed to have a better custom grind for 3.4’s.
-
-
You’ll need a complete gasket set for the intake manifold, plenum, timing cover, rocker covers, water pump, EGR valve, and exhaust manifold. Anywhere there is a part that you are reinstalling that had a gasket, you should basically scrape off the old one thoroughly and replace it. Also, if the engine has over 40k miles on it, you should seriously consider replacing the rear main oil seal. This is a common problem on 60 degree V6 and small-block V8 engines.
-
Mount the 3.4 on an engine stand, and make sure it is well drained of fluids so it doesn’t spill out more every time you flip the engine around. The thread size of the bell housing bolts needed to mount on a stand are M12x1.75 available at most hardware / autoparts stores. Check your stand to determine the length of the shank.
-
Remove the oil filter adapter from the 3.4 and put it in the leftovers box. Transfer the threaded oil filter shaft from the 2.8 to the 3.4 by unscrewing it from the center with a 10mm hex-head wrench.
- Flywheel/Flexplate mounting:
- For manual transmission cars:
-
On 1988s, transfer the flywheel from the 2.8 to the 3.4. It is a neutrally balanced flywheel, which you will need for the 3.4.
-
All other years need an ’88 flywheel or the flywheel from the 3.4 DOHC/TDC engine. The latter weighs about 5lbs more but costs 1/3 as much.
Nathan’s note: for 85-87 cars, you may modify your existing flywheel professionally or do it yourself in 30-45 minutes if you have access to a die grinder. I have not priced out how much it would be to have it done professionally, but doing it yourself isn’t much of a burden. There’s an obvious lug of weight on the front side of the flywheel that needs to be removed and leveled to the rest of the flywheel surface. After it is smooth and flat, take some paint and cover up the exposed metal to deter corrosion.
-
- For automatics:
- 1988: Transfer your 2.8’s flexplate to the 3.4.
- Others: You will need a 1988 Fiero flexplate, or a 3.1/3.4TDC flexplate.
-
Begin by mounting the appropriate flywheel (from step 6) on the 3.4. Then take the starter from the 2.8 and remove the solenoid, which is the small silver cylinder held on by two bolts. There is also a tab that is wedged into the starter body. To avoid damaging the starter, you may need to loosen the long screws that hold on the cover for the motor itself. Remove the solenoid and spring and keep in a safe place (ie, not the floor so you can easily “access” it with your foot 🙂
With the solenoid removed, you can extend the pinion gear so that it lines up with the flywheel. You want to have a nice overlap. As a side note, if there is any error in placement, make it so that the starter is slightly closer to the flywheel. This way, you can shim the starter back from the flywheel. On the flip side, if you mount the starter further away from the flywheel, you have no recourse.
Align the starter with the flywheel on the side of the engine where the oil filter goes (same position as it was on the 2.8). You will need an assistant for this part. One person needs to hold the starter in place while the other person drills out the two holes necessary to secure the starter in place. Get a drill and tap set for an M10x1.5 hole (should be a 21/64″ or 8.5mm drill bit) and drill the two holes, making sure that you stay perfectly straight drilling into the block. When doing the inner (flat) hole, you may find it is easier to use a center punch and drill it out. While drilling, be sure to use plenty of 3-in-1 oil and have your helper check squareness often with a carpenter’s square. The hole on the outer edge of the block must be drilled into metal which is on a 45 degree angle; this is challenging to say the least, and you only get one shot at it. Use the starter as a template as you drill this hole.
-
Once the holes are drilled, tap threads into them with the M10x1.5 tap. The inner hole should be tapped from the bottom, but the outer hole (the angled one) is easier to tap from the top.
Reminders on tapping: use lots of oil, and if it’s really cold outside get the tap warm before attempting this or it could fracture inside the hole. You do not want this to happen to you.
Spray out the holes with brake cleaner, and you can now mount your Fiero starter on the 3.4 block. Use starter shims as necessary to get a proper strike from the starter pinion gear.
-
If your engine was used, while you’re in the tapping mood you should also tap out the exhaust manifold bolt holes on the head to clean them up. Use an M8x1.25 tap. You are also well advised to replace all of the exhaust manifold bolts. They are M8x1.25×26, 13MM head, Grade 8 (PN 11515757) and are also compatible with Saturn engines, so you shouldn’t have any trouble finding them at a larger dealership. It’s a good idea to use hi-temp anti-seize on them. It will stink to high heaven when you first fire it, but will be worth it when you need to remove them again. An even better way to go is to replace them with studs, as the bolt heads tend to break off after a few years. Rodney Dickman has a complete kit for this here.
The exhaust manifold gasket you will need is Fel-Pro part # MS-93045. Don’t attempt to substitute the less-expensive 3.4 exhaust gasket. It is made of a completely different material and will leak, causing excess heat in your engine bay, spewing uncatalyzed exhaust into the air just behind your head, and generally annoying you with strange sewing-machine noises and engine ticks.
Click here for more information on this subject. Also, since the engine is stripped down, it’s a good idea to tap out any other holes you will use on it. This is not that hard (or expensive) of a task, and is a good idea since many of the holes will need to be precisely torqued. The three common tap sizes are:- M8 1.25 (fine)
- M10 1.5 (coarse)
- M12 1.75 (coarse)
Additional Engine Modifications
-
Bellhousing
Using a large, 7/16″ – 1/2″ drill bit, drill out the threads of the right-most bellhousing bolt hole on the engine. This is where a bolt will pass through to the transmission opposite all the others. If an M12x1.75 bolt will pass through it freely, the hole should be large enough. We had trouble with the alignment on the bellhousing with this hole – the first attempts resulted in the bolt not feeding to the hole at the correct angle – so make sure you can hand-tighten the bolt into the transmission case before you attempt to use a wrench on it. Otherwise you will cross-thread and strip it, and Helicoil kits for this large a metric-size hole are difficult to find and very expensive (>$80). Do not ask how I know this. The transmission case is made of aluminum and the threads are very fragile, so be extremely careful on this step.
-
Block Chop
For cars with automatic transmissions, you will find that part of the block in this area will be in the way of the transmission housing. You will need to cut away part of the block to clear it, a 45* cutoff similar to what is already on the starter side of the block.
-
Oil Pan
- If you have an 85-86 car, use the 2.8 oil pan.
-
If you have an 87-88 car, use the 3.4 oil pan, with an “impact persuasion” modification for engine mount clearance. I’m told you may also be able to use the 2.8 pan for a better fit, but you would at least need to transfer the 2.8 oil pickup as well because the 2.8 oil pan’s baffles are different from the 3.4.
-
Timing Cover
You will need to remove the harmonic balancer from both engines for the timing cover transfer. Do not attempt to remove it with a gear puller or you will damage it. Use only a harmonic balancer puller for this. Again, familiarize yourself with chapter 2 in a Haynes manual, or the Engine chapter in an equivalent manual. Also, remove the 3.4’s crank pulley and put it in the leftovers box.
The timing cover must match the oil pan. 85-86 is one design and 87-88 is another. The 87-88 timing cover can be used with the 2.8 or the 3.4 pan.
-
Cleaning Gasket Surfaces
Be sure to clean all gasket material from both sides of the timing cover’s surfaces. This can be a very time-consuming operation. The cover is made of aluminum and is thus very fragile. Be extremely careful if you use a gasket scraper or you will damage it. Also, a recommended sealant for the timing cover and water pump gaskets is a blue goop called Hylomar HPF. Use disposable gloves with this stuff because it basically never cures.
-
Water Pump
Now is the time to replace your water pump if you choose to do so. Otherwise reuse the Fiero’s water pump. Do not attempt to use the 3.4’s water pump or timing cover as its flow is backwards that of the Fiero, and the timing cover is also missing a necessary boss to attach the lower A/C bracket. If you buy a new pump for an 87-88 car, you may need to transfer the plug from the old pump to the new one, as the ones intended for 85-86 engines have a pipe instead. This may require a torch to free the plug.
-
Harmonic Balancer
You will need to transfer the timing mark on the 2.8 balancer to the 3.4 balancer. To do this, align the crankshaft notches on both balancers, and use a ruler at the 2.8 notch to mark the new notch on the 3.4 balancer. You can use a Dremel or a Hacksaw for this, then coat the notch with a clear coat enamel so it won’t rust and turn orange.
-
Accessory Transfer
Begin transferring the 2.8’s accessories and brackets to your new engine. You should install the 3.4’s fuel injectors onto the Fiero’s fuel rail, using the best O-rings from the two sets you will have. When installing the cold-start injector, we strongly recommend that you replace its o-ring. Several people have had problems with a leaky cold-start injector after this swap due to it being aged and fragile and damaging it during installation or removal, and the danger of a fuel leak is far greater than the small amount you’ll pay for a new one. To install the intake manifold gasket, you will need to remove all 12 pushrods. Follow the instructions in your shop manual on how to do this, as it will involve keeping them in the exact same locations when reinstalling them and setting valve lash. Use blue threadlocker on the intake and timing cover/water pump and any other bolts/studs you feel are prudent. There is a plug in the hole of the 3.4 block where the distributor installs from the 2.8, which you’ll need to remove with a large set of pliers if you didn’t already do this during the 3.4 teardown phase. When you transfer the distributor to the 3.4, align the balancer on the crankshaft with 0 degrees on the timing tab, then point the distributor’s rotor at plug #1 on the cap (trace back to the plug closest to the alternator, this is plug #1). This will make your life a lot easier when you go to start it up for the first time, rather than having to guess at the correct distributor/balancer alignment. Also, inspect the black rubber O-ring on the distributor shaft. If it is not pliable and cross-sectionally round, it should be replaced or you will have an oil leak.
-
Oil Pressure Sender and A/C Compressor
If you do not have air conditioning, screw the oil pressure sender directly into the block at the oil filter, without its adapter fitting from the 2.8. Otherwise:
-
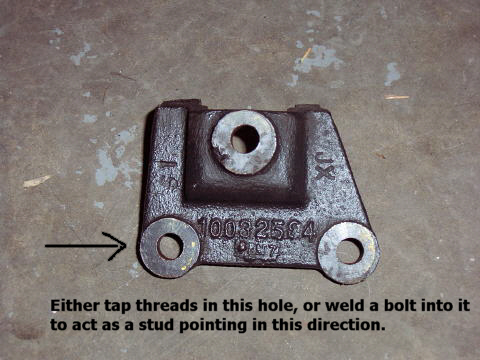
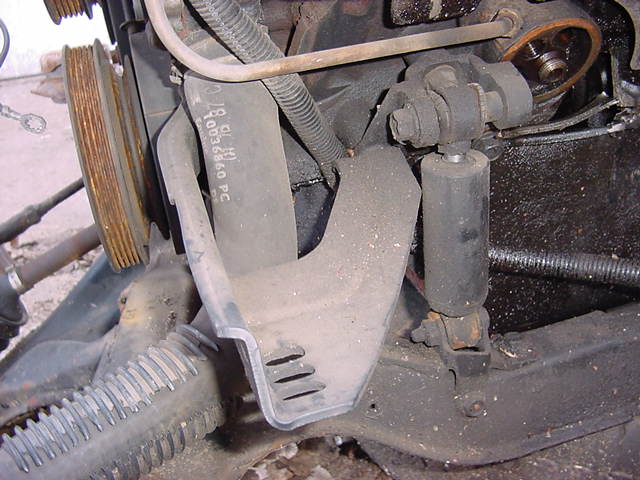
1985-1987 cars will either need to weld an M10 30mm Grade 8 bolt into the back of the engine shock bracket and grind down the head for block clearance (very tight there), or will need to tap the hole in that bracket to screw a bolt directly into it. The other side of the lower compressor bracket attaches to a boss on the front of the Fiero timing cover, but this is not on other 2.8 covers. If you would prefer not to do this modification yourself, you can purchase a modified original shock-mount bracket from Ed Parks at the Fiero Factory, or a new custom-made piece from Rodney Dickman is also being offered here.
-
Because they have no engine shock, 1988 cars will need the shock bracket from an 85-87 car with an 85-87 lower engine mount bracket, or Rodney’s custom mount for the lower A/C bracket as mentioned above.
-
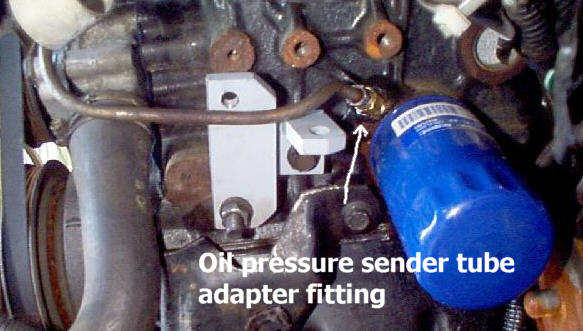
All cars which have air conditioning will need a special 5/16″F – 1/2″M brass adapter fitting for the remote-mount oil pressure sender tube. (I am not absolutely certain of the dimensions of this part, please let me know if it is not correct. The male end must be the same size as the end of the oil pressure sender.) You can see it in this picture. This isn’t a hardware-store item, though it may seem like one. Try your local speed shop, autoparts store, or dealership parts store. I have also asked Rodney Dickman to provide these with his 1988 A/C bracket as a kit since you’ll need both, and they are now available from him here. Even though the tube’s fitting appears to screw into the block directly, the flange on the tube does not seal properly to the existing fitting (you can still move it around) and it will leak a steady stream of oil when you start the new engine and put 50-60psi of oil pressure to it. BTDT.
Recharging the A/C system with R-134a once you reassemble the system is discussed in this document.
-
-
Clutch
Now is the best time to install a new clutch on manual-transmission cars, because you are about to mate the engine back to the transmission. An original-equipment replacement is your best choice, in my experience. I have personally used a stock/OE clutch for the last seven years (now on my second one) and I wouldn’t do it any other way, even if I had a turbo or nitrous. It has never slipped, and the light pedal pressure and smooth engagement is something I would never trade for the harshness and aggravation of a radical clutch that wouldn’t do the job any better.
-
Mounts
Before you reinstall everything, inspect your mounts. This engine has substantially more torque than the 2.8, and will break old and worn mounts. Mine destroyed both original transmission mounts and the lower engine mount within 5000 miles – but they had 112,000 miles on them by then. Replacements are not expensive. As of this writing (2002), front and rear automatic transmission mounts are about $12 each, and the lower engine mount is $27 (or $40 for ’88s liquid-filled unit). L&S part numbers are as follows:
Lower engine mount:
1988: M2548 (solid) or M2548LF (liquid-filled)
1985-87: M2472Front transmission mount (firewall side):
1985-88 automatic: Anchor 2466
1985-88 manual: Anchor 2511, Pioneer 622511Rear transmission mount (trunk side):
1985-88 automatic: Anchor 2467
1985-88 manual: Anchor 2762Polyurethane mounts also exist, but are not recommended for use with this engine. It is not inherently smooth enough and will transmit excessive and unpleasant vibration. They are better suited for use in the smoother and higher-powered sibling, the 3.4 DOHC engine.
-
ECM
While the 3.4 will work with your existing Engine Control Module, to optimize its performance and drivability you may want to recalibrate the ECM for the new engine. The original calibration is a bit outside its ability to compensate in all conditions for the 20% larger displacement, particularly in the wintertime. The injectors from the 3.4 are also of a slightly different design than the 2.8 and it does introduce minor compatibility issues. Reprogramming the chip in your existing ECM is the least expensive option, but it will not eliminate it; upgrading to the 1985’s 6869 ECM with its knock-sensor capabilities is more expensive, but it will do the same and allow for more advance; or the most expensive and complicated option is to upgrade to the 7730 ECM. The 7730 requires you to splice together the main wiring harnesses from both your Fiero and the donor car, but it is so far the only ECM solution which eliminates all the minor drivability and idle-quality issues commonly experienced with the Fiero ECM and gives the best performance. It is also much easier to work with this ECM because it has the most community and aftermarket support, due to its broader deployment in enthusiast GM vehicles like the Camaro, Firebird, and Corvette.
An exhaustive discussion of this subject can be found on PFF here.
-
Installing the engine back on the cradle
Once you have installed the lower engine mount bracket to the bottom front of the engine, lift the engine up about three feet using an engine hoist, and align it over the cradle. Slowly lower the engine into place, taking care to seat the transmission tailshaft into the center of the flywheel/flexplate, and the lower engine mount bracket onto the lower engine mount. You may have to turn both wheels in order to get the tailshaft splines to seat properly. You can then bolt the engine to the transmission. When you install the bellhousing bolt which is backwards all the rest, be sure to note step 10 above.
Relocating the Starter
The trickiest part to the 3.4 conversion is getting the starter bolts drilled on the left side of the engine block. There are lots of ways to do this. One is you can buy a drill-guide template from Fiero Factory or Rodney Dickman for about $75. Alternatively, you can use the starter itself as your template. If you choose to go this route, we’ve found a way to make this a simpler task. If not, go your own way and continue at step 8.
Your conversion is now complete. Follow the instructions in your shop manual to reinstall the cradle into the car and you’re finished!
Once it’s all back together, be sure to prime the oil pump through the distributor shaft using a power drill according to the instructions in the manual before starting it for the first time.
Update 7/17/07: Setting the Ignition Timing
Timing the 3.4 has proven to be one of the tricky parts of the installation. Ideally the 3.4 should be timed to 10 degrees BTDC, the same as the 2.8 it is replacing. The 2.8 is timed as an average of 10 degrees between cylinders 1 and 4, but I’ve personally never been able to find the timing mark when trying to get a reading on cylinder 4 with the 3.4. So if you can’t find the mark on cylinder 4 either, set it at 8-10 degrees on cylinder 1, then take it for a drive and listen closely for pinging. If it pings on regular fuel, try retarding it a couple of degrees on cylinder 1, then try again. I got mine to stop pinging and make decent power at 10 degrees with premium fuel.
Here is a page from the Fiero Forum archives which discusses this situation.
Others are welcome to post their recommendations in the comments below.
Companies:
- Rodney Dickman: http://www.rodneydickman.com
- The Fiero Factory: http://www.thefierofactory.com
The information in this document is copyrighted and is not to be reproduced in any form or medium without the prior written consent of the author.
Hi,
you mentioned on your article that if I want to use a new engine I should go with the GM part number 12363230. I would like to use a 5 speed Getrag with the new engine and transfer all components from the 2.8 to the 3.4 to keep the original look of the car; however, one of the things mentioned on the 3.4 is that it is only for automatic transmissions. Do you know if I could use the 5speed Getrag with this engine and keep the oringinal look of the 2.8? I really would like to do the same that was done by Tony B (see website: fierosound.com) under engine/suppercharged. Thank you very much for your help/time. Pedro
Pedro,
You can use the Getrag 5-speed with this engine in the Fiero. I have done it personally on my own car and there are no issues. In fact, it is easier than the automatic because you don’t have to chop the block “wing” opposite the starter. The statement from GMPP that says, “This engine does not have a clutch boss on the side of the block for standard transmission application” refers to a missing boss for an S-10 manual transmission. It is not necessary for the Fiero’s manual transaxle.
– Update, 10/9/06: Upon reviewing Tony’s fierosound.com site, he is using an entirely different version of the 3.4 known as the 3400, which is a much more advanced engine and a much more involved conversion for a Fiero. The 3.4 referenced on this site is already a good candidate for boost because of its ideal stock compression ratio of 9:1, but it does not need a supercharger. It makes ample low-end torque. Trust me on this, I’ve been driving mine for five years now. A turbocharger is a much better choice for this engine, because it doesn’t breathe well above 4500rpm on its own and would benefit greatly from turbo boost more so than SC boost. A supercharger would do more to increase torque where it doesn’t need it at the expense of your A/C compressor.
This article helped me out tremendously. I have never done anything of this magnitude and my project turned out almost perfect. You really can’t beleive how good it runs with the 3.4 block. I did learn a few things the hard way- Be sure all of your block is CLEAN including the oil galleys!! I suspect my water damaged junk yard engine was not properly cleaned afer I rebuilt it and promptly trashed the lower end in 75 miles. Rebuild number two and a properly cleaned block and a primed oil pump yielded perfect results. Tip for priming the oil pump – take both oil pump drives and join them with a piece of fuel line. Hook one end up to a drill and it will allow you to fill all the oil galleys before starting the engine. Also be very, very careful reinstalling the cold start injector fuel line. My o-ring got damaged and I almost burned my car to the ground on it’s maiden voyage after the second rebuild. Other than that, the project went great. Hope that helps!
Brian Manke
Good suggestions Brian, I’ve updated the page to incorporate them.
Good article, I did this swap around five years ago, was real impressed with the differance in power and tourqe for the price. I did see the part about useing the 3.4 harmonic balancer, I reused the 2.8 because i was told that the only thing that mattered was the flywheel. The engine has had a barely noticeable vibration at idle, could that be the cause? I used the original injectors at first but it wanted to run lean, and even turned on the check engine light on. I replaced the oxygen sensor, same problem. So I put the injectors from the 3.4 in the car wouldn’t run when I first started it. The more I ran it the better it ran, but I still have the problem of it running rich when it cold, as soon as it gets to normal operating temp it runs normal. I was told that the ecm wasn’t designed to run with the disk injectors that where used in the firebird, but I,m not sure what I can get a set of pintal injectors from that will keep the fuel mixture in the right range at all tempetures.
I had one person tell me to use injectors from a pontiac grand am with a 3.4, and had another tell me to use stock ford 5.0 injectors, cause there so cheap and easy to find. I also have had the problem of the lower intake gasket blowing out around the coolant passage, when I inspected the gasket it looks as if something ate at the gasket, the car had clean coolant, only in the car a year, so the acid contant souldn’t have been a issue. Any help on any of these problems would be greatly appreated, especially on the injectors, im sure getting tired of scubing the soot off of the rear bumper.
You have to transfer the 3.4 balancer. The 2.8 damper is tuned differently.
The 3.4 will run lean on the 2.8’s 15# injectors, and the 17#’s are just right but the programming in the ECM is a litle off. You can try to compensate for this with an adjustable fuel pressure regulator, or I’ve heard you can use a quarter in the stock one. But it sounds like if you’re getting soot that you have a bad catalytic converter.
Never heard of the lower intake gasket being a problem, did you replace it with a new one or reuse the old one?
I am considering doing this swap. I just ran across this and wanted to know if you think this would help with the air/fuel delivery issues?
http://www.trueleo.com/Fierointake.htm
I am confused on the engine selection. 93-95 Camaro used a 3.4L engine with 207 CID and the GM Part # in the article is for a 3.4L with 204 CID. I want to buy a rebuilt long block to start with, so I have been asking for a 95 Camaro 3.4L engine, but these are all 207 CID. The 204 CID looks like an upgrade to a 82-85 S10, but when I look for a rebuild engine for that, a 3.4L is not listed.
Can I get some clarification on this?
Tim, it’s the same engine. If it says 204 CID it is a misprint.
Has anyone done this in California and passed the smog test?
Great write up. I’ll have to check my friends 3.4L to see if the harmonic Balancer slipped or is still the wrong balancer.
I have 88 with 2.5 and getrag 5 speed any ideas I seem to recall people using 5.7 V8’S are these conversions something you do turnkey ?
Ed Riley
Ed, if your 88 has a 2.5 it has the Isuzu, not the Getrag, and this will not last long against the substantial torque of the 3.4. Yes, it is possible to do a 5.7 conversion in a Fiero, but this is a very complex and expensive conversion, where the 3.4 swap is practically a drop-in replacement. I do not offer these conversions turnkey.
I have done this conversion in my car back in 2001. For your step 6, mounting the starter, rather then taking the chance with drilling a straight hole on a 45 degree surface, take a piece of steel, a ruler, a speed square, a marker, and a saw (either hack saw or powered) and chop a chunk of steel off that has a 45 degree angle on it. Weld it to the block, making a completely flat surface to drill on. Be sure to grind the mating surface on the block for the starter making it totally flat.
Not only is it easier to drill the holes for the starter but it gives a better surface to bolt to and hold the starter in the right position.
Do you have any info on what the actual hp and torque increase is for this conversion? Is it substantially more than can be achieved by use of a performance chip and cold air intake? (if they are available) Excellent article. I am looking to buy a Fiero and upgrade it as a retirement toy.
Yes, it is a 20hp increase and 30 lb-ft of torque. A performance chip and cold air intake will not net any appreciable gains on a Fiero, nor will they address the oiling problem of the 2.8.
I install the 2.8 oil pan from a 1987 car in the 3.4 and fit already prelube the engine with an old distributor that I grind the gear and everything went nicely you said that it will not fit, how come is there any hidden problems in the future I haven’t install the engine yet and I read your post after I did the installation of the oil pan please let me know thank’s
I’ve been rebuilding a 88 fiero GT with a 3.4 installed replaced the distributor, cap, rotor, plugs, wires and intake manifold gaskets. We’ve gotten it set at 10 degrees off cylinder 1 and it runs, but the front exhaust header gets red hot, I cant seem to figure out what’s causing that other than a possible leak on the intake manifold. Its perplexing me and I cant seem to properly diagnose it. Seeing as the back header isn’t over heating the same. Help!?
Cameron, this is a common problem. If your exhaust manifolds/headers get red hot, you need to retard your timing. Because the 10 degrees timing is set as an average of Cylinders 1 and 4, you either need to make sure your average doesn’t exceed 10 degrees on both, or go with a more conservative calibration on Cylinder 1. I suggest going to 8 degrees on Cylinder 1 and see if that stops the manifolds from glowing.
Any more details on this quote from step 21 would be much appreciated. “The injectors from the 3.4 are also of a slightly different design than the 2.8 and it does introduce minor compatibility issues. Reprogramming the chip in your existing ECM is the least expensive option, but it will not eliminate it.” I have my carport filled with carparts in the midst of a 3.4 swap. I am interested in doing this right the 1st time around instead of fussing around with it for weeks or months. Thanks so much for all the feedback.
Jody, The 2.8 injectors are a disc type, and the 3.4 injectors are a pintle type. You can see the difference by looking in the end of the injectors. They are slightly different and mostly have a minor effect on idle quality, but I’ve run mine that way for 10 years and it worked fine.
Would it be better to use the complete intake with throttle body from the camaro?
No, it wouldn’t.
I have a 1986 gt about to do the 3.4 upgrade, not by choice though I am the original owner of vehicle passed car down to my son. Car ran great until he ran low on water and overheated motor spinning three of the six rod brgs machine shop suggested to look for another block which brings me to this website hope all works out. Your forum has a great deal of info. Will keep you posted of progress. Please feel free to email me of any updates. I think my biggest challenge will be the ECM upgrade if still necessary unless you know of new/simpler upgrade for ECM.
Thank you
Mentally Drained
I have an 88 GT with a bad engine, an am thinking about this swap. This site will be a great help in making the swap successful.
Thanks
Hi! I Have a 1988 gt 2.8 automatic and i want little more horsepower. Is it worth the job to change the engine to a 3.4? On the paper its less that 15hp more The my engine, how much stronger will it be with 3.4 engine?
Thanks for taking the time out to educate us in this process,I will use this information to my best ability,thank u
So, I have an 84 2m4; I have done a ton of reading on conversions such as this on too many sites to count and everywhere omits that one model I need, is this 3.4 swap going to work for me or should I just dig a very large hole and….
I have an 88 Fiero formula, with a 95 Camaro 3.4 swap. Installed new cam/lifter kit. cams is going out at 1500 miles. what could be causing this? I’m using new 2.8 #15 injectors works just fine.using 99 Lum starter. I plan on goin the turbo route for this engine. any ideas to share. thanx.jfiero88.